
Brinestone Courier
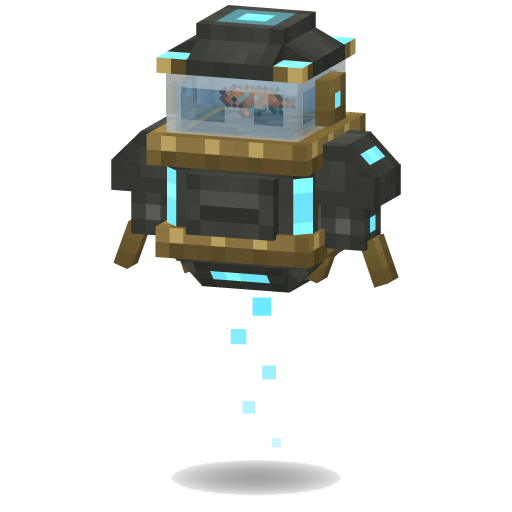
A little flying drone that carries items round your base. Give it a route of chests and machines and it does the fetching for you.
- Carries
- 9 stacks
- Route
- Up to 12 stops: chests, machines or areas
- Range
- 64 blocks round home
- Speed
- About 4.4 blocks a second, adjustable
- Health
- 30
- ID
enthalpy:brinestone_courier
What it does#
The Brinestone Courier is a flying delivery drone with a fish at the controls. Give it a list of stops and it works through them in order, all day, taking items from some and dropping them off at others.
Stairs, walls and stacked machines don't stop it. It flies over them and slips through gaps one block high. Use it to empty a farm into storage or keep a furnace stocked. It'll even carry ore from a far chest to your machines without a single pipe.
A stop can also be an area of ground, where it sweeps up dropped items or empties the hold of a parked Brinestone Borer.
Building it#
 Crafting Table


- Place a Courier Core.
- Put a
 Fishbowl on top.
- Use a fish on the bowl. The Courier wakes up, and where it hovers becomes its home.
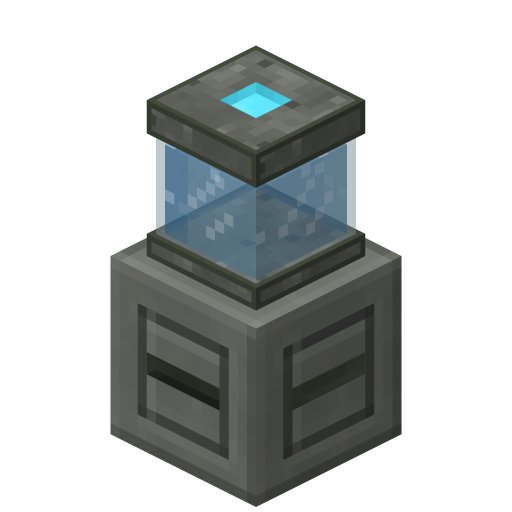
The golems overview walks through each step with pictures.
Setting up a route#
You'll need a Command Tablet.
- Use the tablet on the Courier to link it.
- Use the tablet on each chest, barrel or machine you want as a stop. Each one is added to the end of the route.
- Open the Courier's screen with an empty hand. Click each stop to set what it does.
The face you click matters. The Courier hovers just off it, and a machine treats the Courier like a hopper on that side.
One block can be several stops, one per face. Take a furnace. Click its top and make that stop Deliver, to feed it things to smelt. Then click its bottom and make that stop Take, to collect the results. Use the tablet on a face again and only that face's stop comes off.
Every stop must be within 64 blocks of the Courier's home.
To mark an area instead of a block, switch the tablet to Area mode. See Area stops.
Its screen#
The screen has two tabs. Main holds the route, the stops and the cargo. Upgrades holds the module slot, for a Translocation Module, and says how it travels: Flies, or Blinks to stops.
The Main tab has two pages, and the first shows the whole route.
- Pause sits on the title row, next to Pack up. Paused, the Courier powers down. It lands where it is, its lamps and thruster go out and its arms hang. Unlike a downed Courier, it can still be hurt. Press Resume and it lifts back up and carries on. It stays paused through saves and packing.
- Status at the top says what it's doing.
- Speed is a bar. Drag it, click it or scroll on it to set how fast the Courier flies, from 10% to 100%.
- In order / Random sits on the Route row, above the stops. Click it to change how the Courier picks its next stop.
- The stops are listed in order. Each shows its number, its role chip, its name or its block and side, and its limit. An area shows what it collects and its size, such as "Items 5x3x5". Hover a stop to see where it is. The list scrolls past six stops. Buttons on the right move a stop up the list or remove it. Click a role chip to flip it between Take and Deliver.
- Carrying shows its nine cargo slots. You can take items out or put them in by hand.
Click a stop to open its own page, where you name it and set its role, side, filter, limit and waits. A sentence underneath sums up what the stop will do, such as "Leaves 64 here, takes the rest." Press the back button to return to the route.
While a stop's page is open, its block or area is outlined in the world behind the screen. That's a lifesaver when you have six barrels in a row and need to know which is stop 4.
Stops#
Every stop has a name, a role, a side, a filter, a limit and two waits. A new stop starts unnamed, as Take, on the face you clicked, with an empty filter, no limit and no waits.
Name#
Click the name box at the top of a stop's page and type a name, up to 24 characters. Press Enter, or click elsewhere, to keep it. The name then shows in the route and as the page's title, in place of the block's. After all, "Iron in" reads a lot better than "Barrel" three times over.
Hovering a named stop in the route still shows its block and where it is. Clear the box to go back to the block's name.
Role#
- Take picks items up there. It only takes items that a Deliver stop on the route will accept, so it never fetches what it can't drop off.
- Deliver drops items off there.
Side#
The Side switch picks which side of the block the stop works through: Top, Bottom, North, South, East or West. A new stop uses the face you clicked. All sides reaches every slot, whatever side it's on.
The side only changes which slots the Courier reaches, and it still hovers off the face you clicked. That means a stop on a furnace's top can be set to its side, to deliver fuel.
Filter#
The filter has nine slots. Click a slot with an item to set it, or with an empty hand to clear it. Don't worry, the item stays in your hand. With JEI installed, you can also drag an item from the JEI list onto a slot. The Whitelist or Blacklist switch sits beside the Filter heading.
- Whitelist: only the filtered items pass.
- Blacklist: everything except the filtered items passes.
- An empty filter lets everything through.
The filter matches the exact item, so an enchanted or damaged tool won't match a fresh one.
Limit#
| Limit | On a Take stop | On a Deliver stop |
|---|---|---|
| No limit | Takes everything it can deliver | Gives everything that fits |
| Per visit | Takes up to that many each visit | Gives up to that many each visit |
| Leave behind / Fill to | Leaves that many there and takes the rest | Tops the stock there up to that many |
Set the amount with the plus and minus buttons, from 1 to 4,096. Hold shift to go 16 at a time, or scroll for one at a time. Only items that pass the stop's filter are counted.
Waits#
A stop can make the Courier hang about for a while. Both waits start at none and go up to 5 minutes.
- Wait before: it hovers at the stop this long before it takes or gives anything.
- Wait after: it hovers this long before moving on.
Click to step a wait up, shift-click to jump ten steps, or scroll. The steps are half a second up to 10 s, then 5 s up to a minute, then 30 s. Give a slow machine a wait before so it has time to finish, or let a Courier linger by a window for the view. Waiting costs nothing, though the Courier does nothing else meanwhile.
It only waits at stops it actually visits, so a stop it skips for having nothing to do gets no wait.
Area stops#
An area stop is a box of blocks, not a chest. The Courier collects from it in one of two ways.
- Dropped items: items lying on the ground inside the box. It flies to them and scoops up every item there that passes the filter, as a hopper would.
- Borers: the holds of Brinestone Borers parked inside the box. It hovers beside one and takes from its hold. It only empties Borers owned by its own owner, and only parked ones: nobody aboard, not down, standing still on the ground.
Only what's inside the box counts. An item lying just outside, or a Borer standing half in, is left alone.
Marking an area#
- Link a Command Tablet to the Courier.
- Sneak and scroll the mouse wheel with the tablet in your hand. It switches between Stops and Area mode, and says which.
- In Area mode, click one corner block, then the far corner. As you look about between the two clicks, an outline shows the box. It turns red while the box is too big.
- The box between the corners, both included, joins the route as an area stop.
Mark the same box again to take it off the route. If a box is refused, the tablet keeps your first corner, so you can try another far corner without starting over. Sneak-clicking still moves the Courier's home, in either mode.
While you hold the linked tablet, its Courier's areas are outlined faintly, so you can see what you've marked.
Rules for areas#
- The whole box must lie within the Courier's range of home.
- No side can be longer than 32 blocks.
- An area is only taken from, so its role is fixed at Take.
- Its limit is None or Per visit, since there's no stock to leave behind on the ground.
- Its filter, waits and place in the route work as any stop's do.
An area's page#
An unnamed area's page is titled Item area or Borer area, with its size where a block's position would go. Hover the size to see its corners.
- The Collects switch sits beside the name box and flips between Dropped items and Borers.
- Width, Height and Depth are steppers. Click or scroll one to grow or shrink the box a block at a time. It stays centred where it was.
- A box can't shrink below one block. It can't grow past the size limit, out of range, or into another area stop.
The outline in the world follows the box as you resize it, so you can fit it to a room without guessing.
How it works the route#
The switch on the Route row sets how the Courier picks its next stop.
- In order is the starting setting. The Courier visits its stops from top to bottom, then starts again at the top.
- Random sends it to any stop that has work, picked at random. Loads then spread between several Deliver stops without you setting limits.
Either way, it skips any stop with nothing to do, so it only flies where there's a job. When the whole route is quiet, it naps and checks again every few seconds.
There's no nearest-first setting. The order of the route is yours to choose, and going by distance would leave far stops waiting.
It carries as much as its nine slots and the stop's limit allow. At each Deliver stop it drops off everything that passes the filter, up to the limit, then plans the next trip at once. A busy route keeps it on the move.
It won't carry anything with items inside it, such as a filled shulker box or bundle, another mod's backpack with something in it, or a packed golem core. A Take stop leaves those where they are, and they don't count as work. Empty ones travel like any other item.
In order, per-visit limits share a load down the list. Say stop 1 takes 64 coal a visit, and stops 2 and 3 each take a delivery of 32 a visit. The Courier picks up 64 and drops 32 at each.
Its status tells you what it's doing:
- Idle: nothing to do right now.
- Fetching and Delivering: on its way to a Take or a Deliver stop.
- Waiting: hovering through a stop's wait before or after.
- Paused: you paused it. Press Resume on its screen, or click the air with its linked tablet.
- Can't reach a stop: it tried for 10 s and couldn't get there. It skips that stop for 30 s, then tries again. Clear the way, or move the stop.
- Heading home: it was outside its range and is flying back.
- Down: repairing: it was knocked out. See Down, not dead.
Translocation Module#
Crafting Table


Put a Translocation Module in the module slot, on the Courier's Upgrades tab, and it stops flying between stops. It blinks there instead, with a puff of portal sparkles and an ender pearl's sound. After each blink it waits 1.5 s before the next.
That makes a long route much faster. Where there's no room to land by a stop, it flies there the old-fashioned way.
Tips#
- Put the stops in a sensible order. Placing Take stops just above the Deliver stops they feed means less flying back and forth.
- Use Fill to on a machine's input to keep it stocked without stuffing it full. Use Leave behind on a farm chest to keep seeds back for replanting.
- Slow it down on the speed bar if it's zipping round your workshop too fast to watch. It's very keen.
- A Courier never loads chunks. Keep its route where you spend your time, or near a chunk loader.
- Want two routes? Build two Couriers. A route holds at most 12 stops.
For pack makers: the Courier's settings
| Setting | Default | Range | What it does |
|---|---|---|---|
golems. | 64 | 8 to 96 | Blocks from its home a Brinestone Courier's stops may be |
golems. | 32 | 1 to 128 | The most blocks a side of a Brinestone Courier's area stop may be |
golems. | 10 | 1 to 600 | Seconds a golem past its leash may make no headway home before it teleports there |
Add an item to enthalpy:courier_refuses to keep Couriers from carrying it. It's empty by default; anything already holding items is refused without it.
The Courier's health, cargo size, stop count and speed are fixed. Repairs use the shared golem settings on the overview.
Related#
- Brinestone golems: building, the tablet, repairs and packing up
- Brinestone Sentinel
- Brinestone Reaver
- Brinestone Angler: a Courier can keep its bait stocked
- Brinestone Borer: a Courier can empty its hold
- Freight Conduit: moves items through pipes instead
- Automating a machine line
- Side configuration